
Introduction

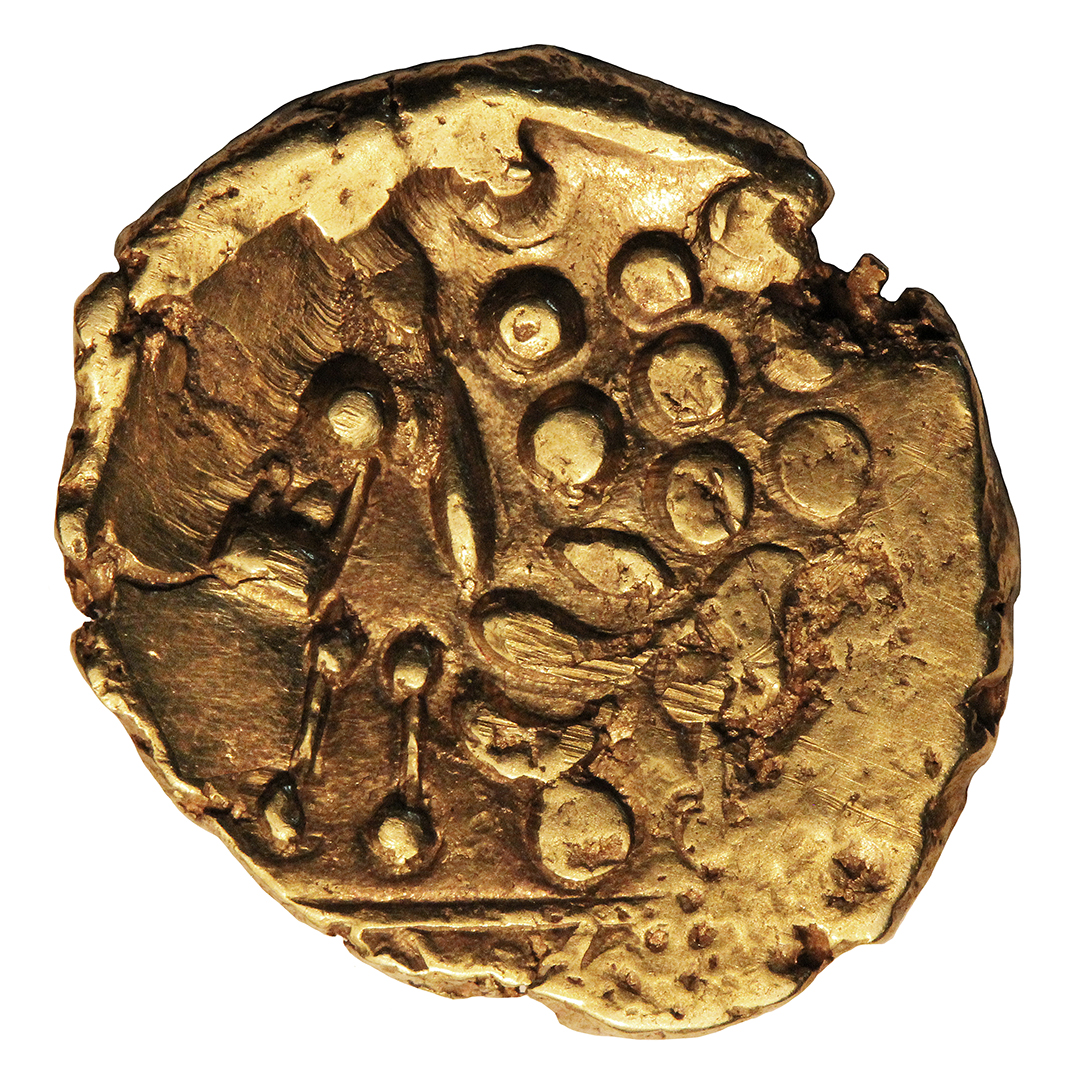
This might be the ugliest Southern Westerham stater known. It's been ignored – never reported to the Celtic Coin Index. Somehow, it found its way to a coin dealer in Las Vegas, Nevada. The dealer listed it in an online auction, where I found it.
An ugly coin can be a beacon for numismatic research. This one is the most informative I've seen in 65 years of studying coins.
You see, it's the last coin ever struck from the die pair. Its witness marks tell us exactly how the die failed, because they were created at the instant the reverse die was destroyed.
This coin probably gets us as close to the striking operation of an ancient mint as we'll ever get. It gives us insight into the mint procedures used to extend die life.
The coin's virtually unworn – saved as a curiosity? Mint workers may have have paid closer attention to coin images than we would expect.
Explaining the Die Damage

The area outlined in red has parallel lines, ones that never appeared on the die. A stereomicroscope analysis indicates they're scrapes across the flan's surface. They're not the "flow lines" you expect to see from old dies. Flow lines are shallow abrasions across the die's surface, ones that become struck onto the flan. The difference is easy to see in a stereomicroscope, but impossible to reproduce in a single photograph.
The area in red reveals a separation between the main part of the die and an edge chip that's broken off. (Details) This gives us an opportunity to recreate the second-from-last coin from the dies. Comparing the Penultimate Coin to the Last Coin will reveal the final destruction of the die.
Simulating the Penultimate Coin Struck

Using Photoshop Editing Software, we can erase the area in red (and a bit more more) that was never struck by the die. The result shows two images – the part struck by the main part of the die and the portion struck by the broken-off piece. The arrows show the direction the broken die-piece travelled as it separated from the rest of the die. It is the jagged edge of this die-piece that scraped the flan as it broke off.

By simply joining the two images, we can simulate how the Penultimate Coin looked. The two parts join perfectly. This image lets us see the state of the reverse die before it was completely destroyed.
Analyzing this image carefully gives us even more information about the history of the die.
Final Destruction of the Die
The first thing to note is a large flat area from two to six o'clock on the Penultimate Coin. This is the result of a previous die break on the other side of the coin.
Normally, the mint worker would hold the trussel (upper die) perpendicular over the pile (lower die), as shown in the first photo, below. Once the die broke, the worker couldn't use it in the normal way. It would produce a large, unsightly cud on the coin. (Info) Furthermore, the die would continue to break at the edge until it completely failed.


The area outlined in red shows where the earlier die break occurred. It's not identified with any precision, because the cud hasn't been struck-up. (Details) The mint worker has taken action to assure the die will receive no more stress in this area.
The result looks like a flat-struck area, commonly seen on Celtic coins. But it's more than that – it's a tip-off that the mint worker has suddenly done something different.

The worker has tilted the die away from the broken edge to relieve the stress in that area. The edge of the flan in that area really isn't struck by the dies on either side. (Background) What you see is the flattened surface of the flan, created during flan-manufacture.
Tilting the trussel merely transfers the stresses to the other side of the die – assuring that the die will eventually break there. But the mint worker may get some extra strikings done before the die finally fails.
The Penultimate Coin demonstrates the trussel was tilted as indicated.
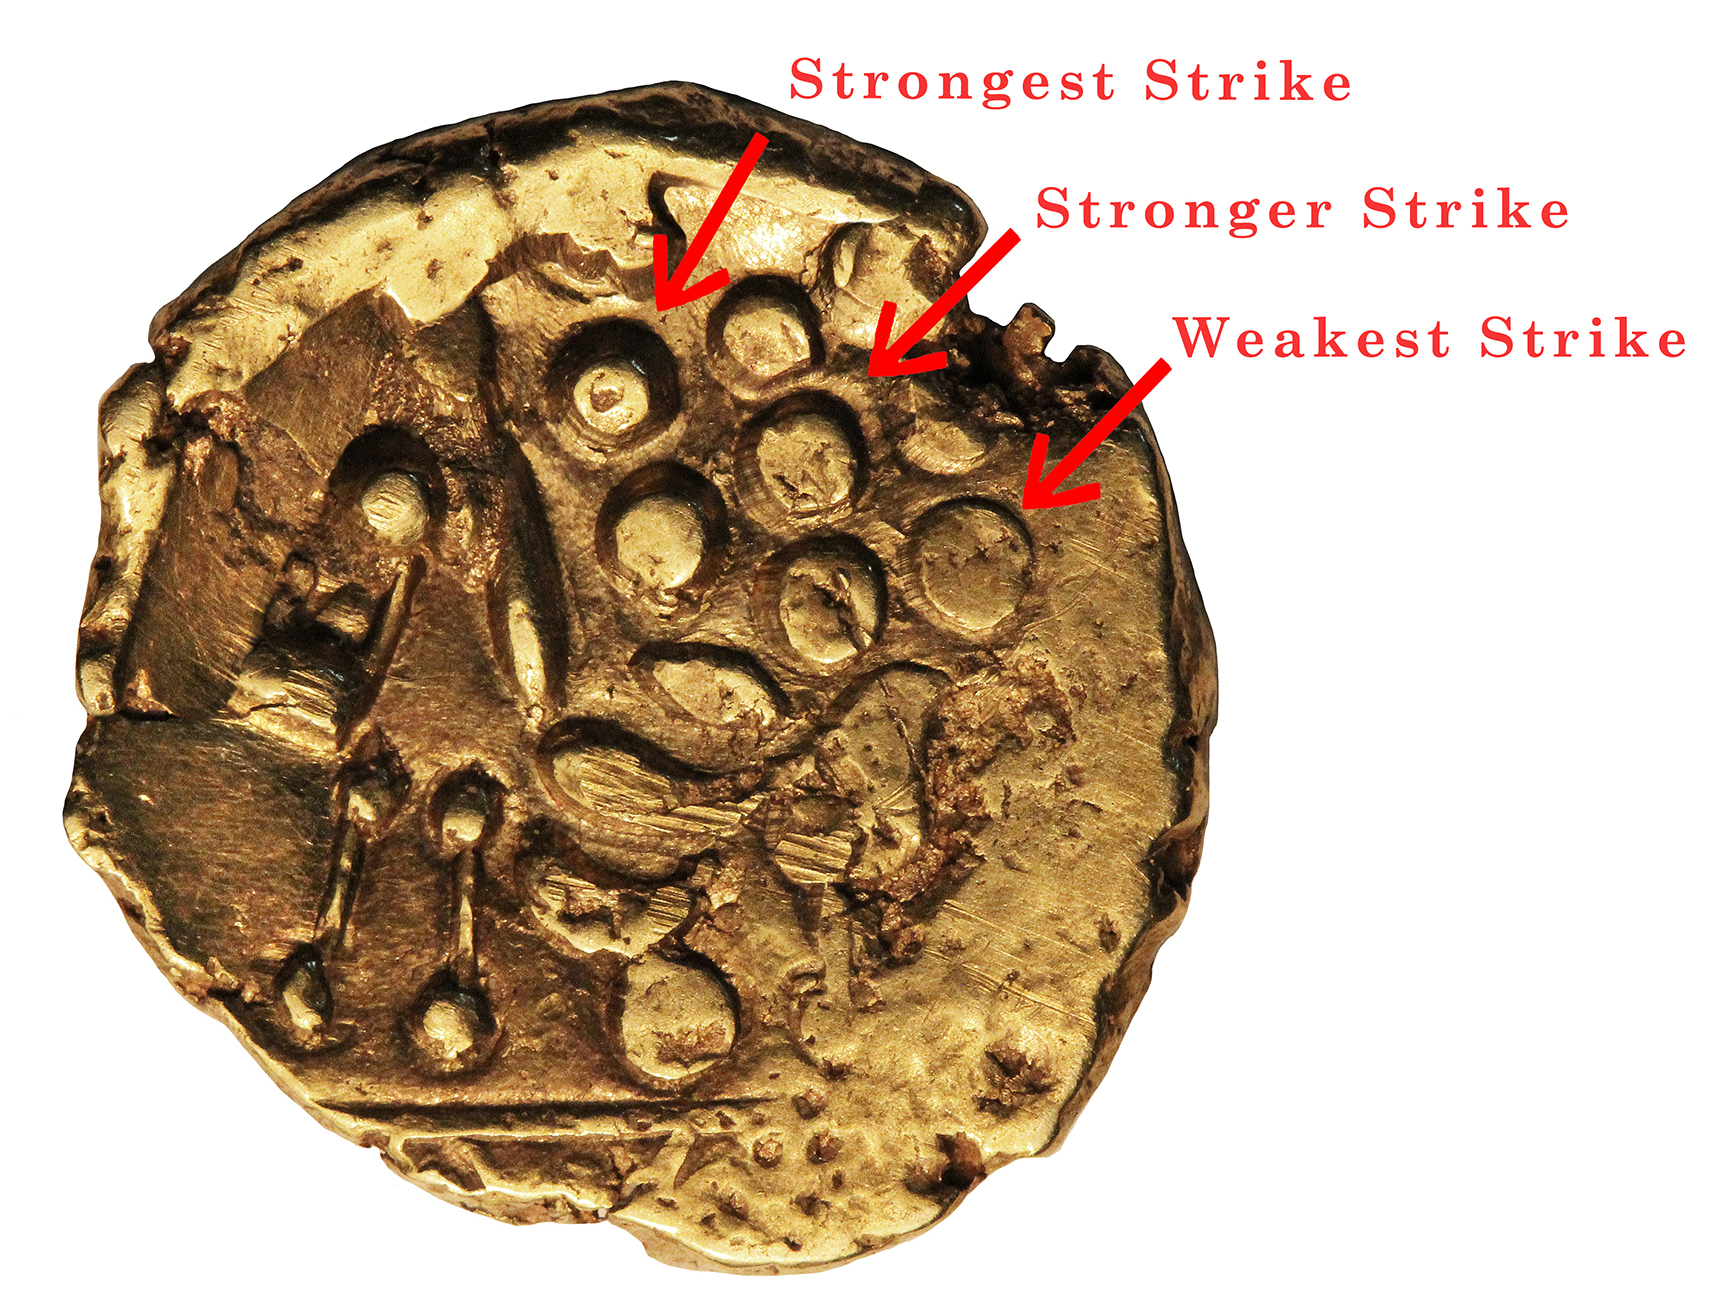
By tilting the trussel, the worker produced coins that were strongly struck on the left and weakly struck on the right. In between, the striking pressure should gradually increase as you go from right to left. Looking at the three pellets (red arrows), this is exactly the effect produced.
The Last Coin Struck

The final destruction of the die occurred when the die catastrophically failed on the left hand side.
At this point, the die would be useless. If the worker started holding it perpendicularly, it would produce coins with two huge cuds – ones that couldn't be ignored.
The final strike from the die unfolded thusly:
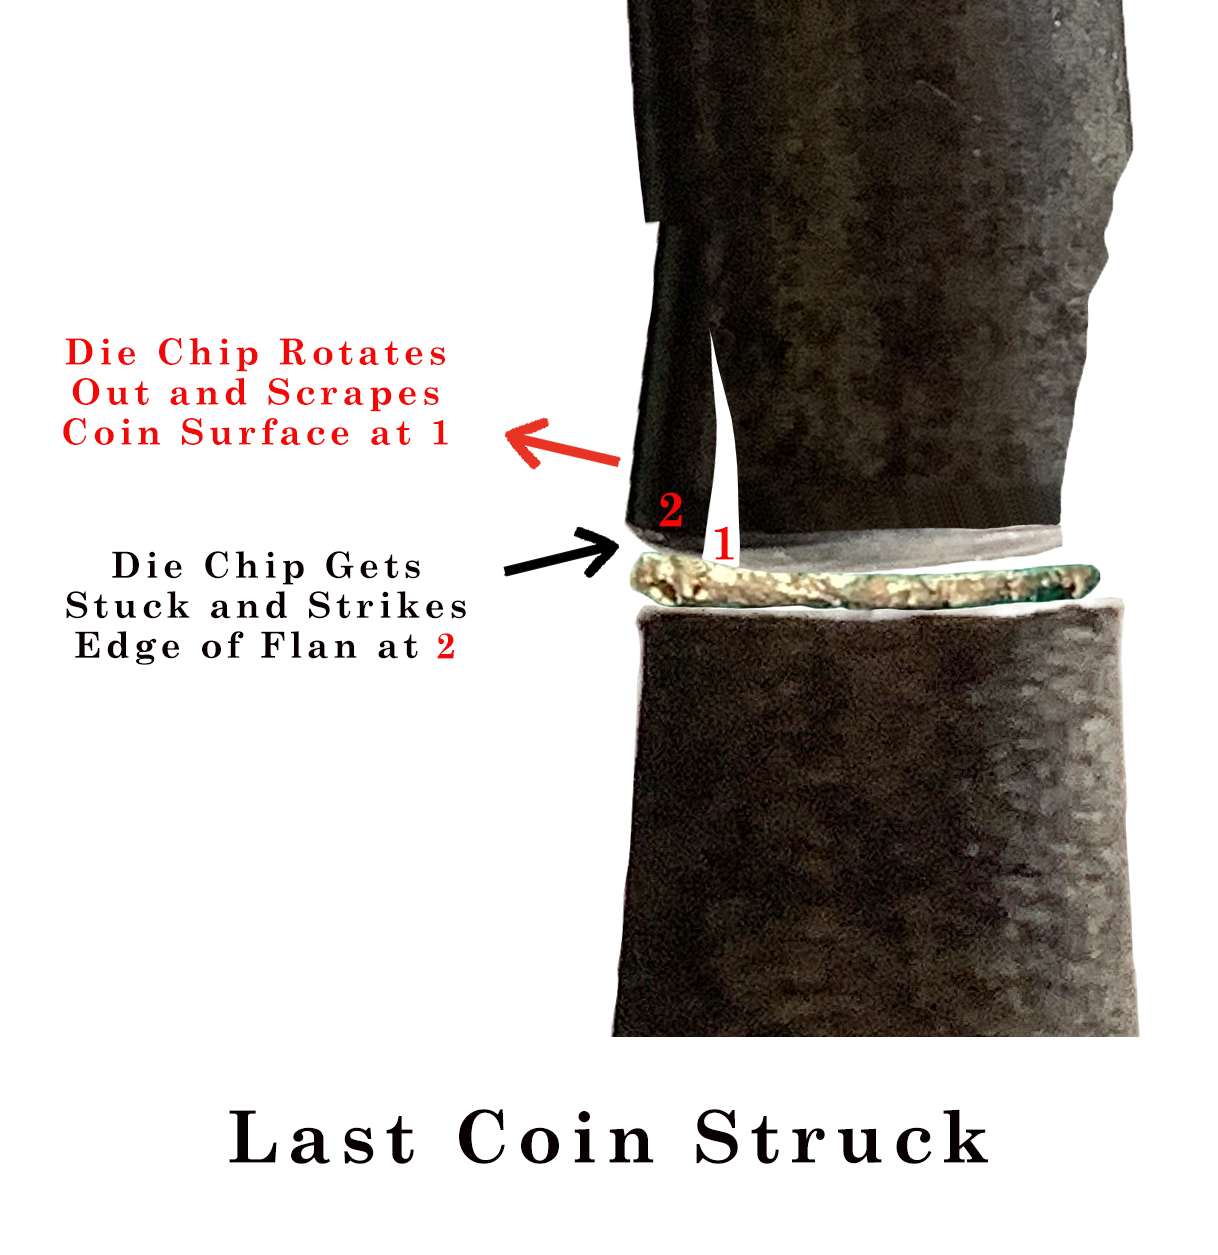
- As the Last Coin was struck, a piece broke off the die on the left side.
- This piece started to rotate out of the way, and its jagged edge scraped the flan at "1" in the photo. The red arrow shows the direction of rotation.
- As the piece slid away, it suddenly became stuck between the body of the trussel and the flan at "2".
- The broken piece then struck the edge of the flan.
These events happened in an incredibly short span of time (perhaps tens of milliseconds). After the trussel was lifted, the broken piece fell away. This assured that no identical coin could ever be struck from the dies. The Last Coin is unique in the strictest sense of the term.
It's useful to note that the upper surface of the flan bends upwards to match the radius of rotation of the die-piece. The flan in the photo is the actual Last Coin produced.
Note also that the image shows that the right side of the coin wasn't struck between the dies at all – producing the flat area on the coin.
Summary
The Last Coin is instructive for several reasons:
- It demonstrates that mint workers were concerned about die-life. They took action to get extra use out of damaged dies.
- Tilting a die was one method used to extend die-life.
- Flattened areas on coins may hide the fact that a broken die was in use. If there's a gradual increase in striking pressure away from the flat area, the mint worker may have tilted the die intentionally.
- Mint workers paid sufficient attention to their work to notice that dies had become damaged.
As always with such generalities, whatever happened in a given case could vary from mint to mint, time to time and worker to worker. But this coin does suggest that mint workers in Celtic mints could be concerned about their craft.
Some Final Thoughts
The most tantalizing question is why does this coin exist today? If it's a waster, why wasn't it simply thrown back into the melting pot and used to make a new flan?
It's important to note that the coin really has no circulation wear.
It may be that the coin was such a curiosity that the mint worker set it aside. Perhaps the mint master kept it as a keepsake – that it never travelled far from its place of manufacture. If we could learn of its findspot, it might be close to the site of a Celtic mint.
End
